Thursday, December 27, 2012

New Year, New Career? 5 Ways to Get Your Resume in Shape Too!


SIGH. The end of the year cometh, and I find myself thrilled about what is to come in 2013, but also saddened that this means the END of Christmas treat-eating. Pretty much everyone under the sun is talking about their go-to diet strategy for 2013, but y'all would be surprised how many people have the same habit of getting-in-shape-procrastination when it comes to job hunting.


It sounds something like, "yea I really need to update my resume, but I'll just wait til after the holidays and then start putting it out there."

I don't disagree too much with this type of procrastination because the fact is that there's a lot less hiring going on at the end of the year anyways, and it's disheartening to the job seeker to troll the job boards only to find openings at the local Taco Bell. SO - my advice to you is to take this last little bit of downtime in 2012 to get your resume in shape and be ready to land your dream job all before bikini season!! (I know you are stoked about how much extra gym time this is going to give you after the ball drops. yeesh.)


FITNESS - tshirt from Etsy


Here are 5 easy "exercises" to make your resume sparkle in the new year!

1. CLEAN IT UP. If your resume is in a template you hijacked from MS Word, get rid of it and start over, WITHOUT a template. They are gross and make your resume look just like everyone else's. If the font of your resume is still in Times New Roman, may God have mercy on your soul. Ok that's a little extreme. Try fonts like Calibri, Arial, Helvetica, or Tahoma. These are the easiest to read on a computer screen (which is most likely where yours will be seen).


2. GET THINGS IN ORDER. If you've been out of college for more than 6 months, this is the order the sections of your resume should be in.

CONTACT INFO
SUMMARY STATEMENT
RELEVANT WORK EXPERIENCE
EDUCATION
ORGANIZATIONS/MEMBERSHIPS/ASSOCIATIONS
REFERENCES (if required)


3. TRIM THE FAT. Do not list your hobbies or extracurriculars unless they are related to the jobs you intend to apply for. Also, leave the dates off your education. They give us clues as to how old you are and if you think age doesn't secretly matter to a hiring manager, you're wrong. Take off your extracurriculars from college (unless you just graduated). It no longer matters that you were Treasurer of your sorority (this was a hard one for me to swallow!). Only include references if they are required by the job you're applying for. Otherwise, a simple "References available upon request" will do just fine.


4. BE BULLETPROOF. Limit your bullet points to 3 per position, except your current one. In that case, it's only okay to have more than 3 if you have that many actual, legitimate accomplishments you think you need to share. If bullet point #4 is something like, "arrive at work promptly every day and manage coffee maker output," I invite you to visit Wikipedia and search for the definition of "accomplishment." If bullet point #4 sounds more like, "contributed to reduction of annual employee turnover from 22% to 12% by implementing a New Hire Mentoring Program," you may continue.


5. BE FIRST-DATE FABULOUS. I always always ALWAYS tell people to look at job hunting like dating, and I am sure a million other recruiters say the same thing. If you've completed the workouts above, LOOK at it one last time and ask yourself, "if this resume was me, would it get asked on a second date?"


Two things here: one, don't treat your resume like an online dating profile full of lies. Just don't. You will be found out, and then dumped (by your boyfriend, and your prospective employer).

Two, just like a good Southern girl, don't give it up on the first date, and don't let your resume give it all up either. Your resume should only include enough information to get you to the next step. You'll have plenty of time in the interview to make sure the hiring manager knows about your mission trip to Africa and your mad Photoshop skills. But if you scare him/her away with a three-page resume detailing your life timeline, they'll have nothing left to talk to you about in the interview. And they'll probably be so bored from scanning your resu-novel that they won't call you for one anyways.


As always, these are just the opinions of a lowly recruiter, BUT I do hope they ease your pains of getting in shape for 2013, especially if your resolution is to find your dream job this year! Happy job hunting!

Pin It!

Sunday, December 23, 2012

A Quick Bite: York Peppermint Chocolate Fudge Cookies

Well I've just wrapped my Christmas baking and am about to settle in for a long winter's nap. Can't sign off for the official days of Christams until I share this with you though: York Peppermint Chocolate Fudge Cookies. Yes. Take it ALL in now, YES.


Can't take credit for it - came from Sally's Baking Addiction, found through Pinterest. Click here for the recipe. Easy peezy - the only hassle is that you have to use a few different bowls to mix everything. Other than that it's impossible to screw up. In the words of Honey Boo Boo's mom, they aint the most beautimous thang out the box, but THEY. TASTE. GLORIOUS. You'll be singin' Fa La La all the way to Grandma's house with these bad boys!!


And we still had time to enjoy the nice sunshine today.....


Cheers to you and yours my friends! I am reminded during this happy season that I have absolutely everything I ever wanted (see my adorables above) and am so thankful our Savior was born this Christmas!


Pin It!

Saturday, December 22, 2012

Chocolate Crock Pot Candy


It is always a good thing when you like the people you work with. I have two dear friends in my office that teach me how to be domestic on a daily basis. One of them, Julie, is the quintessential city-girl-gone-country, thanks to her (precious) small-town husband she met at a funeral. Yep! Packed herself up and moved all the way up here from big-time Dallas! Anyway, she bounced into work the other day with these little goodies, which she calls Crock Pot Candy. I only ate two four, and then not only asked for the recipe, but asked her to go with me to the store to make sure I got the right stuff, because these things are GOOD. And EASY. My two favorite things!  Dang. I want to eat one right now. I think I will......

OK...The full recipe is at the bottom if you'd rather skip the photo play-by-play.

First things first - your ingredients. This makes a LOT of candy. Julie has two adolescent boys and a husband, so it's no wonder she likes this recipe! :)


On these, the only thing that might throw you for a loop is the two different kinds of peanuts - you want one bottle of UNSALTED and one bottle of SALTED. If you can't find salted (I couldn't), a bottle of Dry Roasted Peanuts is also just fine.

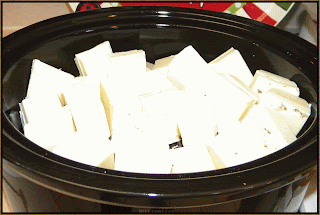
Now get out your crock pot, and start by layering the peanuts, unsalted first. Pour out the whole bottle and then pour the whole bottle of salted/dry roasted.


Next cut up your german chocolate bar into squares and layer it, followed by the bag of semi-sweet chocolate chips.


Finally, cut your almond bark (yes two packages) into squares and place it in on top. I must pause here for a shoutout to my BFF Cathy, because she works for the company that makes Ginsu knives, and she hooked me up with one that made this a LOT easier!! If you are in the market for a good knife I recommend them - you can buy on Amazon!


Now, turn your crock pot on low for three hours. DO NOT STIR IT. DO NOT STIR IT. DO NOT STIR IT. Before the end of the 3 hours you may smell a slight burning smell - do not panic. This is the peanuts roasting on the bottom. It will be glorious if you just wait it out, I promise.

Instead, go pour yourself a glass of Christmas Cheer and wrap some presents while you wait. Also, please note my Holiday Mantra: Christmas Calories Don't Count. These are great words to live by from Thanksgiving to New Years.


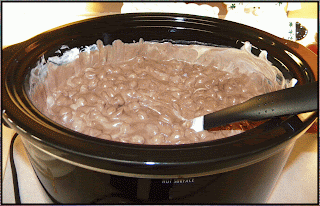
After 3 hours, turn your crock pot off and get to stirrin'!


Cover your countertops with wax paper, and if I were you I would double my wax paper layers. This mixture is pretty hot and I would not want it to melt the wax paper and stick to your counters. I say cover your countertops because remember I said this makes a LOT of candy.

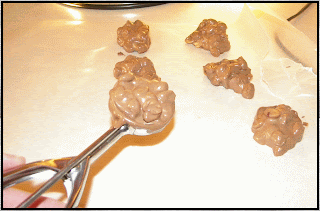
Spoon onto the wax paper in big tablespoon sized hunks and let it cool for two hours (or until they are hard).


ENJOY! It made so much I stuck some in a mason jar with some twine and a card and gave to the neighbors as a Christmas gift (which they LOVED). Thanks Jules for getting me hooked on this!!


FULL RECIPE:

CHOCOLATE CROCK POT CANDY


Ingredients

1 jar unsalted peanuts
1 jar salted (or dry roasted) peanuts
2 packages white almond bark, cut in squares
1 8oz German chocolate bar, cut in squares
1 bag semi sweet chocolate chips

Layer all ingredients in crock pot in this order, starting on the bottom:

unsalted peanuts, salted peanuts, german chocolate bar, semi-sweet chocolate chips, almond bark

Cook on low 3 hours. DO NOT STIR.

After 3 hours, turn off crock pot and stir until all ingredients are mixed together. Spoon in big tablespoons onto wax paper (double wax paper layers) and cool 2 hours. Makes about 50 pieces.


Merry Christmas!!


Pin It!

Thursday, December 20, 2012

Did it Ourselves: New Nightstand!


This is my first piece of furniture to revamp. Thanks to Miss Pinterest, I found a TUTORIAL on Censational Girl's blog and I followed it EXACTLY. I'll hit the high points here for you, but if this is a project you want to do, she will lead you on the path of painting righteousness.

I picked up this nightstand for $25 at an antique store, and it is a solid wood piece. Mind you, this is a tutorial for PAINTING furniture, not STAINING it. I wanted something more eclectic than a traditional wood stain, so I knew painting was the way to go. You don't actually have to sand your furniture to do this (another reason I didn't want to do a stain), just clean it really good and if you feel like you MUST do some sort of sanding, just grab a piece of whatever you have laying around and go over it lightly. Just remember to clean all the sand-dust off before you prime.

CG says in the TUTORIAL that the right bonding primer is the key - and she is RIGHT about that. She recommends an oil-based Zinsser cover stain and I second that completely.


You can get this stuff at Lowe's or Home Depot. It also comes in a spray version, which is what I got for this project because it's a pretty small piece, and I was really worried about being able to see brush strokes. I did 2 coats of primer on mine. I was nervous when I finished because it didn't look like it covered really well on the bottom shelf, but it turned out fine (especially if you plan on glazing it or distressing it at the end).


After this it's pretty much easy painting. CG says in the TUTORIAL to paint by hand (not spray, unless you have a professional paint sprayer). Get any interior paint you like at Lowes or Home Depot (I like the Behr brand at HD the best), and get a really good brush. Note - it doesn't really matter what finish your paint has because you're going to polyurethane it at the end, and THAT is the shine you'll end up seeing. So it's fine to get the less expensive flat paint!

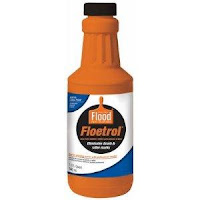
CG also turned me onto something called Floetrol, a product you mix with your paint to slow drying time and eliminate brush strokes (can also be found at Lowes or HD).


Floetrol is for latex paint, and there's an oil-based paint equivalent called Penetrol that does the same thing. It is a wonderful product and does absolutely everything it claims to do. I will use it on every brush-painting project I do from now on.

Paint your two coats (allow for drying time), and then get ready to glaze! CG has some links on her page for some good glaze tutorials. For mine, I bought a paint sample (you don't need very much actual paint) in brown and a quart of the glaze base (again also bought Behr brand), mixed the two together and followed the instructions on the glaze. It is seriously idiot-proof, you can't mess it up.

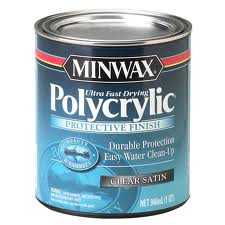
Let that dry overnight and then ALWAYS make sure to use polyurethane to protect your project. CG also turned me on to Minwax Water-Based Polycrylic. Buy it in a quart and it'll go a long way. This is also where you select the amount of shine you want. I didn't want my piece to be super glossy because it's kind of rustic, so I went with a satin finish.


I did two coats of it to finish my nightstand, and then added the new drawer hardware (found at Hobby Lobby for $3).


VOILA! Trust me now, if I can do this, anyone can!


Pin It!

The Fastest Way to Get Your Resume Deleted

I always tell people that the first thing they need to change about their resumes is to take out their Objective statement. These were popular in the pre-online-application dark days when people were out physically dropping off resumes in front offices, whether there were positions open or not. In that case it made sense to have something at the top of your resume that let the hiring manager know what positions you were interested in, should they come available....that way he/she didn't throw your resume into a random pile, such as this:


God bless the internet. Now when I get resumes, they are filed away neatly in an online storage world called an applicant tracking system, and I don't have to wonder what positions you're interested in, because you told me in your online profile.

I do think it's better nowadays to replace the objective statement with a Summary statement, put in the same place on the resume. While I'm okay with this, I'm NOT okay with the crap-words most job seekers are using to fill up their summaries.

Here are my top 10 (or 12) words to take off your resume (immediately):


highly motivated

driven

focused

self-starter

accomplished

extensive

energetic

results-oriented

people person

diverse

strategic

high-level


Just so you know, I got these DIRECTLY from resumes I've been looking at for the last month or so (although they're the same words I've been seeing for years). And it took me about 30 seconds to think them up - that's how top-of-mind they are to me. The thing is, these are all good words, but when they're on 8 out of every 10 professional resumes a recruiter sees, they don't really mean anything anymore. In fact, if I'm being honest, when I see these words on a resume, my gut reaction is to assume the person googled "example resumes" and just copied and pasted some standard stament. Therefore, I'll assume that if you can't even think up your own words to write a resume, how are you going to contribute anything original to this job? DELETED. It's always better to use non-pompous words that fit your personality and your background. If you're a professional, and you're applying for a job that is professional, the things up there in those buzzwords are EXPECTED of you. There's no need for you to re-iterate them.

Examples of summary statements that will not make me hate you:


"New nursing grad eager to begin full-time career in healthcare."

"Marketing professional with 4 years PR, copywriting and graphic design experience."

"10-year tax accountant relocating to the Dallas area in October."


Easy. Short, to the point, tells me who you are and what you want. Now you have my attention.

As always, I would love to hear your thoughts on what's happening in the job market right now! Leave a comment and let the fun begin!


Pin It!

Wednesday, December 19, 2012

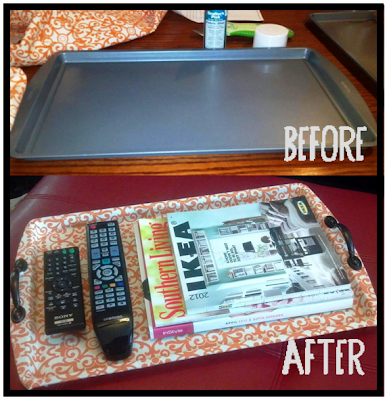
Did It Ourselves: Cookie Sheet Crafting

My BFF Cathy (Cat) is a really good Pinterest Pinner. Unlike me (and most of you), she only pins things she has a legitimate interest in pursuing, whether that be a craft, recipe, outfit, whatever. Since I moved away from her last year, a lot of our reunion gatherings have included craft time, which is AWESOME. This allows for simultaneous creating of pretty things while also catching up on happenings back home (with the occasional glass of wine!)


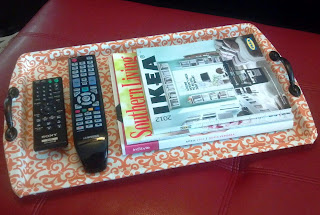
Anyway so in all her brilliance, a few months back Cat came up with this craft idea (I think she got it from Pinterest but I could be wrong. But then again, where did we find crafts before Pinterest??) On one of my home visits we spent a rainy Saturday creating THIS:


Y'all I just have to tell you, this turned out WAY better than I thought and was also WAY easier than I thought to pull off!

Here is what you need:
  • cheapest cookie sheet imaginable (just make sure it has sides and if you want handles like the one above, make sure the ends of your cookie sheet are a little wider so you have room to attach them)
  • fabric of your choice (We each got a yard, but you can get less if you feel like you are better with measurements than we are. You need enough to cover the front and sides, and an inch or two of overhang on the back/bottom)
  • felt (you will use this to cover the bottom. Makes a better sitting-surface than regular fabric. Any color is fine, you won't see it.)
  • spray adhesive (get at Hobby Lobby or even Walmart may have it)
  • If you want handles, get two drawer pulls at Home Depot or Lowes. Just make sure they aren't wider than the ends of your cookie sheet.
  • Gorilla glue (if you're doing handles)

Literally, all you have to do is cut your fabric so that it will wrap around the front/top of your cookie sheet and still leave enough room to slide up and around the sides, and have an inch or two left for the back.

Cover your surface/table with newspaper. Spray glue is about to get everywhere.

The hardest part of this is keeping your fabric straight while you're pressing it onto the cookie sheet to stick. To combat this, we sprayed our cookie sheets in small sections, starting at the center. Press your fabric onto your sections a little at a time, smoothing out any bubbles. Keep going until you've sprayed and covered the front and sides.

Flip your cookie sheet over so that the bottom is facing up. Again start from the center, pulling the fabric toward the center so there aren't any bubbles until it's all been glued down. The corners will look messy becuase you'll have a lot of fabric congregating there. That's ok, you're not going to see them anyway.

Cut your felt in a rectangle that will cover all but an inch around the bottom of your cookie sheet. This should cover any metal still showing and make a smoother-looking edge, because your fabric underneath is probably going to look messy.

Let it all dry really well. If you're doing the handles, use a bit of gorilla glue under each end of your drawer pull and stick them onto the fabric. When you use gorilla glue it's best if you can use a clamp to really push your handles into the glue, but if you don't have a clamp it's ok. Just put pressure on them for a few minutes and it'll be fine. A little bit of that stuff will go a long way, so be careful. Any excess is going to come out from under your handle and it dries in a crunch white-ish consistency that is quite hideous.

Let it sit over night and you should be all set! The only thing I would caution you of is that if you DON'T use the clamps on your handles, don't use them to pick up your tray when it's piled with magazines and whatnots - just pick it up using the cookie sheet ends or the tray itself.


I love this project because the fabric and handles can be totally customized to fit your decor! I use mine as an ottoman tray to hold remotes and magazines and I LOVE IT! And I love that I got make it during craft time with my BFF! I am sure there will be many more cat-crafts to come. :)


Pin It!

Why Your Interview Suit May Not "Fit" Anymore


I would like to rant to you today about something old and antiquated that drives me nuts: the notion that all job interviews warrant the wearing of The Interview Suit.


I'm not telling you to go burn your interview suits (although that would be awesome). Some of you probably work in places where they're the norm, and you probably don't mind wearing them. Forty years ago I'm sure they were the norm in lots of places. But, thankfully, times have changed and many companies have changed their cultures and dress codes along with them. All I'm saying is that for the job you're looking for, you might not have to break The Suit out of hiding after all.

What irritates me about The Dreaded Interview Suit is this idea we're taught by career services offices in every college any of us ever attended that we won't get hired unless we wear that Suit to every interview at every company until the end of time. Wrong. SO WRONG! What we should wear to the interview depends entirely on the industry, company, and job we're going to be doing!!!

This is what my recruiter brain hopes for in the ideal job seeker:

1. LEARN about the company's culture. This means researching them to the point of knowing what the employees who will be your coworkers wear to work everyday. This means digging around on Linkedin, facebook, the twittersphere, and even news articles to find out what it's really like to work at this company. If your research leads you to believe this is the type of company that has an open-bar Christmas party and a holiday for opening day of duck season, you can probably leave The Suit at home.

2. LEARN about the industry you're getting into. I knew nothing about the oilfield before I got this job. My future boss (Jedi) knew this, and thank heaven he told me to dress business casual for my interview. I had already gotten The Suit out, thinking I better be on the safe side, but I am telling you right now if I had walked into that office in a suit, no one would have allowed him to hire me. Girls in suits do NOT fit in in a frac field office. I should have done enough research on the company and the industry to know this on my own. Luckily I was Saved by the Boss. You might not be so lucky, so learn this stuff now.


If you're going to work for an old-school bank or chamber of commerce, go ahead and wear The Suit. If you're going to work in a manufacturing plant with a tiny office crammed in front of it, tame it down a bit. You don't want to have to opt-out of a plant tour during the interview because you can't fit a hard hat onto your overdone hair. If you're interviewing for a position in retail and you haven't been to the store multiple times to get an idea of how people dress, I hope they don't hire you.

3. LEARN how to showcase your personality - the right way. We all love leopard print. So much. And it's perfectly fine to incorporate it into your interview wardrobe, if you do it carefully. And by carefully I mean that you should never wear a jacket made of leopard print. Make sense? I always think shoes are the best way to give people a hint of your personality, as long as you don't go to extremes. Leave your clubbing shoes at home, but don't be afraid to wear the cute red pumps you just bought - as long as you can walk in them!


If nothing else, know this: making it to the in-person interview usually means it's down to you and a small handful of other similarly qualified people. USE this chance to be DIFFERENT from the rest of the handful and show that you are a good FIT for this company. That's what the in-person interview is about - finding the person whose personality is going to add to the (hopefully good) company culture. Good resumes are a dime-a-dozen. Good personalities are not! If you are reading this, I am SURE you are a super wonderful person, and this is your chance to dress the part!

I would love to hear what you guys are experiencing out on the job market! Leave a comment and let the fun begin!


Pin It!

Tuesday, December 18, 2012

Did It Ourselves: Window Cornices

Chad and I bought our first house together in September. Someday I will do an entire post full of "before" photos of this place, but not today. For now I will just say that our Project List for it is about 3 years and too-many-thousand-dollars long. I absolutely love this house and the neighborhood it's in, but the original (1998) brass-tastic trimmings of it have GOT. TO. GO. We're tackling it one yellow-gold project at a time.


One of the easiest things we've done (and one of the only projects I have a before and after pics of) was to build window cornices for our breakfast room. I didn't want curtains in there because there isn't a ton of room between the table and the windows, and I didn't want someone to have to fight a fabric maze just to take the seat on the back side of the table.

Here's what the room looked like when we moved in:


Why yes, that IS fruitly wallpaper, and that is absolutely a green faux marble and brass ceiling fan....in a breakfast room. Does it really get stuffy enough in a breakfast nook to warrant a ceiling fan? Maybe....

Anyway, you will never hear me tell you how to do projects (talk about the blind leading the blind!) - all I can tell you is where I got the dummied down instructions I used to do them. Before we did these cornices we did some other spruce-up work to get us started. Chad the Wonderful actually stripped all this wallpaper the week after we moved in while I was traveling for work, and we painted the walls shortly thereafter. We also tore out that ceiling fan IMMEDIATELY and replaced it with the chandelier that was originally in the big dining room (after it was spray painted of course. More on that to come).

For the cornice project, Miss Pinterest led me to a blog called be.love.create and we followed their instructions as close as we could for this revamp. Go there if this is a project you are thinking about doing. Their tutorial is way better than anything I could ever tell you.

Here is how it ended up. The fabric and batting were a 50% off deal at Hancock Fabrics, and we bought the wood (1'x6"s) at Home Depot. The only thing I would add that wasn't in the tutorial I used is that you need to get upholstery fabric, not just any old thing on a bolt in the store. We got 3 yards for this and it was just the right amount (but then again we had three windows to deal with). Chad the Wonderful built the wood framework and I covered them. Teamwork people!


I think it turned out really well, especially considering the whole project only cost about 80 bucks and only took about 3 hours! Still way cheaper than buying drapes/curtains for 3 windows!

We still have to paint the ceilings in the kitchen but we're at a standstill on that because the living room and kitchen share a ceiling....yet we painted the walls in both rooms very different colors. So we are in a war over which color to lighten up for the ceiling. I will let you know who wins that battle. ;)


Pin It!